All posts by admin

Sage 50 Accounts Download 2026 – How To Manually Download Updates?

Sage 50 Download

Downloading Sage 50 the right way matters more than most businesses realize. Whether you’re installing it for the first time, upgrading to 2026, or reinstalling after a system change, a secure and verified Sage 50 Download ensures proper licensing, compliance, and performance. In this article, you’ll be taken through each and every step that’ll make your downloading experience hassle free.

For secure and verified Sage 50 accounts download, speak directly with certified Sage professionals +1-888-440-2022.

Sage 50 Download – Complete 2026 Installation And Update Guide

When thinking of Sage 50 Download, it’s crucial to have an understanding of what are you actually installing and how the licensing system works. Sage 50 is an accounting software that is desktop based and designed for small to mid sized businesses. It is available in three editions: Pro, Premium, and Quantum, each supporting different user capacities and feature levels.

Always download Sage 50 directly from the official Sage customer portal. The installer is digitally signed to ensure file integrity and security.
A download of Sage 50 can be performed for:

  • First-time installation.
  • Reinstallation on a new computer.
  • Upgrading from an older version.
  • Deployment of network in environments that consist of multiple users.

New users may also access a trial version before committing to a subscription. After installation, activation validates your 24-character serial number and confirms your subscription status through Sage’s online licensing system.

 Sage 50 2026 Features

Sage 50 2026 download brings improvements that are practical and centered on automation, compliance, and ease of use. This release improves the basic accounting functionality and minimizes tasks for finance teams. The most up to date version comes with:

  • Automated invoicing, real-time aging visibility, and improved tracking to accelerate collections.
  • Payroll and Compliance updates like, Secure Act 2.0 enhancements, updated multi-state tax tables, and improved payroll accuracy.
  • Expanded bank feeds, smarter transaction recognition, and automated reconciliation.
  • Custom invoicing, detailed expense tracking, and vendor aging analysis for better cash flow management.
  • Multi-warehouse inventory tracking, automated purchase order matching, and comprehensive job costing.
  • 150+ financial reports, customizable report design, flexible exports, and multi-user role-based access.

The improved installer within Sage 50 2026 download also auto-fills serial fields and detects missing components before installation begins, reducing setup failures.
Before moving forward, it’s essential to confirm your system meets all requirements, which we’ll cover next.

System Requirements Before Sage 50 Accounts Download

Before knowing all about how to download Sage 50 accounting software, verify that your system meets official compatibility standards. Most installation failures happen because minimum requirements were ignored.

OS (Operating System)

  • Windows 11 Pro or Home; 64-bit, version 22H2 or later.
  • Windows 10 Pro or Home; 64-bit, version 21H2 or later.

Hardware Based Requirements

  • 2.0 GHz Processor (quad-core minimum).
  • Minimum 8 GB RAM; 16 GB recommended for a multi-user environment.
  • 5 GB of free disk space storage.
  • Display with 1024 × 768 resolution minimum.

Software And Network Prerequisites

  • Microsoft .NET Framework 4.8 or later.
  • Latest Windows security updates installed.
  • Broadband internet connection that is stable; minimum 5 Mbps.
  • Administrator-level access required.

Sage 50 may install Microsoft SQL Server Express automatically if it is not already present. Ensuring these requirements are met before beginning how to download Sage 50 accounting software significantly reduces installation and activation errors.

How To Download Sage 50 2026 Latest Version?

However, it is imperative that one understands the correct way of how to download Sage 50 so that the complete package with all the latest updates is what you get. One should only be using Sage customer portal for this downloading task.
Below is a complete download process explained step wise:

  • First, open Google Chrome or any other browser that you prefer.
  • Navigate to the official Sage customer portal.
  • Then, log in with your registered Sage account credentials.
  • Select the “Downloads and Updates” from your dashboard.
  • Choose “Sage 50 Edition 2026”.
  • Select your edition: Pro, Premium, or Quantum.
  • Choose the full installer package, not an incremental patch.
  • Lastly, save the installer file locally before running it.

When following the steps for how to download Sage 50, make sure the file size matches the expected range. After download, right click the installer and confirm the digital signature to verify authenticity.

This process completes your Sage 50 accounting download securely and ensures you are installing the most current build.

Get The Best Assistance For Your Sage 50 Accounting Download!

Get expert assistance for your Sage 50 Accounting download. If you encounter installation errors, compatibility issues, licensing activation problems, or update failures while downloading Sage 50, contact our certified Sage 50 experts for fast, reliable technical support

Call Now

How To Install And Activate Sage 50 2026?

After you download Sage 50, proper installation is very crucial to avoid licensing or database errors. Follow the official setup sequence carefully.

Pre-Installation Checklist To Look For:

  • Log in using a Windows Administrator account.
  • Temporarily disable antivirus real-time scanning.
  • Confirm at least 5 GB of free disk space.
  • Close all background applications.

Below Are The Installation Steps:

  • Right click on the downloaded installer and select “Run as administrator”.
  • Allow the system to extract files.
  • Review and then accept the End User License Agreement.
  • Enter your serial number of 24-characters.
  • Choose Single-User or Network installation.
  • Accept the default directory (C:\Program Files\Sage 50).
  • Complete installation and restart the computer when prompted.

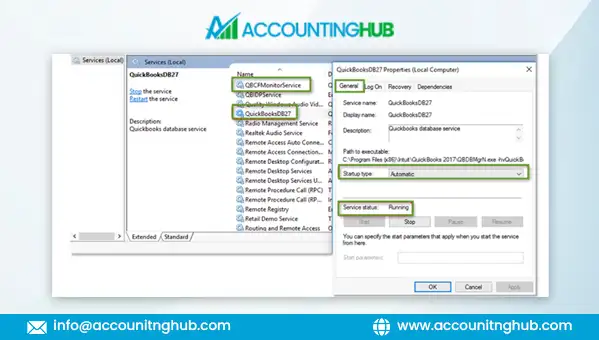
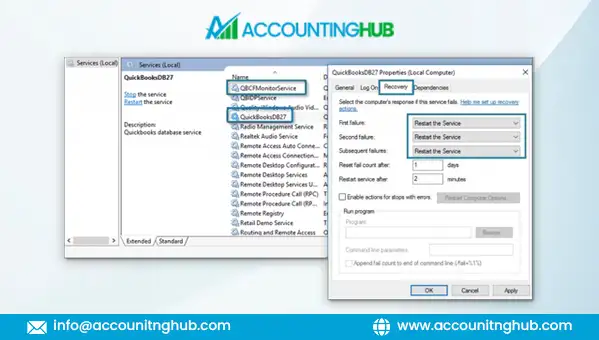
The restart finalizes service registration and database configuration.

How To Activate Sage 50 2026?

  • Open Sage 50 on the main system or server, go to Help.
  • Select Sage 50 Activation, Licensing, and Subscription Options.
  • Choose “Change your current version”.
  • Enter the new serial number.
  • Confirm under Help → About Sage 50 Accounting.

Activation verifies your subscription directly with Sage servers and ensures your license is valid.

How To Upgrade The Older Versions To Sage 50 2026?

By updating your current version of the software using the proper Sage 50 accounts download process, you can be sure about the security of your financial information and enjoy the latest updates in terms of compliance, payroll, and performance. Here are the steps to follow in order to avoid data corruption and migration failure.

Step 1: Back Up Your Company Data

Before upgrading, create a full backup of all company files. To create a backup, follow the below given steps:

  • Open Sage 50, go to File, then select Backup.
  • Select All Company Data.
  • Save the backup in .zip format.
  • Store one copy on an external drive.
  • Store another secure cloud copy.

This dual-backup strategy will protect your data in case the migration fails or power/network interruptions occur.

Step 2: Prepare The System For Upgrade

  • Close all Sage 50 instances, verify the same in Task Manager.
  • Disable antivirus temporarily.
  • Make sure that you downloaded the full 2026 installer, and not any patch update.
  • Confirm at least 5 GB of free disk space.
  • Log in as Windows Administrator.

Avoid using incremental updates for version upgrades, always run the complete installer package.

Step 3: Run The 2026 Installer
Execute the full installer for Sage 50 2026:

  • Right click installer, and click on Run as Administrator.
  • Select Upgrade Existing Installation.
  • Choose the company files you previously backed up.
  • Allow the migration utility to convert the data tables, it will typically take 15–45 minutes per company file.
  • Let the system automatically update tax tables after conversion.

During this stage, Sage upgrades your database structure, payroll modules, and compliance framework to 2026 standards.

Step 4: Post-Migration Validation

After the installation is complete:

  • First, open Sage 50, and create a test invoice.
  • Then, run an Aged Receivables report.
  • Process a sample payroll entry.
  • Lastly, verify the updated tax tables.

And in any case, if the validation tests fail:

  • Uninstall 2026, and then reinstall using the full installer.
  • Restore the .zip backup file.

In case your system is showing conversion errors, it is suggested that the system should be restored from the backup immediately, and the upgrade process should only be repeated once the root cause of the problem has been fixed. One should never use the system in a state where the file has not been upgraded properly.

Proper upgrade of the system ensures that one is compliant with the new 2026 payroll laws, new tax tables, better bank feeds, and new security enhancements, all while ensuring the integrity of the financial data.

How Sage 50 Updates Work Automatically?

Once installed, Sage 50 come with a built in update service that automatically checks for product improvements, payroll tax table revisions, and compliance updates. Many users ask, where does Sage 50 download updates when these automatic prompts appear, understanding this helps prevent confusion in multi-user environments.

By default, Sage 50 checks for updates each time the software connects to the internet. If a new service release or tax update is available, the system downloads it in the background and prompts you to install it upon closing the application.
So, where does Sage 50 download updates during this process?
Updates are temporarily stored in system-managed folders, typically under:

C:\ProgramData\Sage\Simply Accounting\Updates

For multi-user systems, the server will download the update first, and then the workstations will synchronize when they are opened again. Payroll updates and product updates will be downloaded separately to ensure tax compliance.

Keeping automatic updates enabled reduces security risks, prevents payroll miscalculations, and ensures your version remains fully supported.

 How To Manually Download Updates Sage 50?

Sometimes Sage’s automatic update system fails, especially when a firewall, proxy, or corrupted download interrupts the process. In those cases, knowing in Sage 50 how to manually download updates and where are Sage 50 update download location saves time and prevents frustration.

Step-by-Step Process For Manual Update

Step 1: Close all open company files, and verify that there are no lingering processes in Task Manager.
Step 2: Then, log in to the Official Sage Customer Portal with your registered account credentials.
Step 3: Go to the Updates or Downloads Section, and opt your 2026 Sage 50 Edition product. Select the relevant update that you need to download.
Step 4: Download the update File. Save the .exe or .msi file to a local folder that is secure.
Step 5: Disable the antivirus temporarily, and make sure you have admin rights, also create a backup before you start installing.
Step 6: Right click the update file, opt Run as Administrator, and follow the prompts on screen until completion.
Step 7: Restart your PC, open Sage 50, go to Help → About to confirm the new build number.

Where Are Sage 50 Update Download Location?

Update installer files, whether from automatic checks or manual downloads, land in one of these common Windows locations before installation:

  • C:\ProgramData\Sage\Updater.
  • C:\Users\Public\Documents\Sage\Downloads.
  • Windows temp folders (e.g., %AppData%\Local\Temp).
  • Your company data folder under Updates if downloaded via Online Update tool.

If you see more than one folder with the update files, check the timestamps, the most recent files are usually the ones that are relevant.

Manual control over updates is critical in case automatic downloads fail or if you need specific patches instantly. By following this process and knowing where are Sage 50 update download location, you cut downtime and keep your accounting system compliant and stable.

Common Sage 50 2026 Download Errors – Causes And Solutions

Even after following the exact steps for downloading, there are various reasons why you might fail successful Sage 50 accounting download. Here are some of the common reasons why you might fail to download the software, along with their causes and solutions:

1. Sage 50 Error 1603 – Fatal Installation Failure
Install Shield error caused by the absence of admin rights, damaged files, blocked components, or Windows installer problems. To solve this problem:

  • Run installer as Admin.
  • Temporarily disable antivirus and firewall.
  • Update Windows and .NET frameworks.
  • Clear temporary files before retrying.

2. Sage 50 Error 1308 – Source File Not Found
The setup is not able to locate the required files because the installer is either incomplete or incorrect. To overcome this error:

  • Delete the downloaded file completely.
  • Re-download full installer from the official Sage download portal.
  • Avoid running installer from cloud sync folders (OneDrive/Drive).

3. Installer Blocked Or Interrupted By Security Software
Antivirus or firewall flags Sage files, especially update packages as threats. So to avoid it from happening:

  • Pause real-time protection during download/install.
  • Add Sage installer and program folders to your security exclusions.

4. Missing Required Windows Components / DLL Issues
If required system frameworks (.NET) or Microsoft packages aren’t installed or are corrupted:

  • Install/repair Microsoft .NET Framework, that is required by Sage.
  • Ensure Latest Windows updates are applied.

5. Permissions And Access Errors (Various Codes e.g., 1606, 1628)
The causes for this is usually insufficient permissions, conflicting installs, or blocked install scripts:

  • Always use an administrator account.
  • Close all other applications before installing.
  • Restart your system before retrying.

6. Insufficient Disk Space Or Temp File Issues
If there is not enough free space for temporary extraction and installation:

  • Free up space on your drive.
  • Clear your Temp folder (%temp%) before starting.

If your Sage 50 accounting download keeps failing after basic troubleshooting, our certified experts +1-888-440-2022 can provide fast resolution and save you hours of trial and error.

So, in this guide, you’ll find everything you need for a successful and secure Sage 50 Download, from obtaining the official 2026 installer to installing, activating, updating, and troubleshooting common issues. Also where update files are stored, and how to prevent avoidable errors to keep your accounting system running smoothly.

Whether you’re installing fresh, upgrading from an older version, or managing updates over time, following verified procedures ensures compliance, reliability, and data integrity.
For professional assistance with any Sage 50 Download +1-888-440-2022 is where you’ll find the best experts to help you out!

You May Also Read:
Sage Error List

Frequently Asked Questions

Is Sage 50 2026 Free To Download?

You can download Sage 50 2026 from the official Sage customer portal, but a valid license or subscription is required to activate and use the software beyond any trial period. Sage does not offer a permanently free version, only limited trials may be available.

Where Does Sage 50 Automatically Download Updates?

Sage 50’s update utility automatically downloads product and tax updates in the background when connected to the internet. These update files may be stored temporarily in system folders like C:\ProgramData\Sage\Updater or local temp directories before installation.

In Sage 50 How To Manually Download Updates?

Yes, in case automatic updates are not successful or are disabled, you can manually download the update installer from Sage Support site and then run it in administrator mode.

Why Is My Sage 50 Accounting Download Not Installing?

Lack of admin privileges, blocking by security programs, absence of Windows prerequisites such as the .NET framework, or damaged installer files might cause interruptions in the installation process, and in such cases, it is recommended that the installer should be run in admin mode, the AV/firewall should be disabled, and all prerequisites should be installed and should meet the requirements.

Windows Firewall Is Blocking QuickBooks: Why And How To Fix It?

Windows Firewall Is Blocking QuickBooks

A firewall is one of the most important components of network security because it monitors incoming and outgoing traffic to block unauthorized programs. However, there are situations where Windows Firewall is blocking QuickBooks, preventing users from accessing company files or performing accounting tasks.

When this happens, it can interrupt financial operations and slow down business workflows. In this guide, we’ll help you in understanding why it occurs and how to fix it to restore smooth system performance quickly.

If a Windows firewall blocking QuickBooks is disrupting your workflow, connect with certified QuickBooks professionals for immediate assistance by calling +1-888-440-2022.

Why Is Windows Firewall Blocking QuickBooks?

When Windows Firewall is blocking QuickBooks, it usually happens because the firewall security system restricts certain network ports or program permissions that QuickBooks requires to run properly.

QuickBooks relies heavily on network communication between the workstation and the company file server, especially in multi-user environments. If the firewall is blocking the required ports or services, the application may not be able to access the company file, connect to the database server, or even communicate with other workstations.

Below are the most common causes behind this error:

  • Misconfigured Firewall Rules: Firewalls configured incorrectly may prevent QuickBooks services from being able to communicate with the network, leading to QuickBooks firewall blocking problems.
  • Incorrect QuickBooks Port Configuration: QuickBooks Desktop needs specific ports in order to exchange data with the database server. If these ports are closed, you may encounter windows firewall blocking QuickBooks server errors while opening company files.
  • Server Communication Failure: In multi-user setups, the database server manager connects workstations to the company file stored on the server. If a Windows firewall blocking QuickBooks server communication occurs, users cannot access shared company files.
  • Multi-User Mode Restrictions: Improper hosting configuration can trigger windows firewall blocking QuickBooks multi user problems, blocking multiple users from working on the same file.
  • Operating System Compatibility Issues: Sometimes Windows 10 firewall blocking QuickBooks happens when security policies are stricter or improperly configured. The older systems could also experience Windows 7 Firewall blocking QuickBooks compatibility issues.
  • Third-Party Security Software Conflicts: Antivirus software sometimes comes with firewall protection, which may hinder QuickBooks connectivity.
  • Blocked QuickBooks Services: QuickBooks Database Server Manager services may not function properly unless firewall permissions are granted.

Understanding these causes makes troubleshooting much easier because you can identify which configuration is preventing QuickBooks from communicating with the network properly.

If Windows Firewall is blocking QuickBooks and preventing access to your company files, but you aren’t able to disclose the exact reason, contact our QuickBooks experts +1-888-440-2022 for immediate assistance.

Consider Points Before Fixing Windows Firewall Is Blocking QuickBooks Error

Before proceeding with advanced troubleshooting procedures, it is essential to carry out a few fundamental checks. Completing these checks will enable you to easily troubleshoot QuickBooks firewall blocking problems and ensure that the troubleshooting process is smooth.

Some of the checks to consider when dealing with windows firewall blocking QuickBooks problems:

  • Update QuickBooks Desktop: It is crucial to ensure that you have updated your QuickBooks Desktop to the latest version. Updates may have essential security updates to help solve the problem with the firewall.
  • Verify Your Internet Connection: An unstable or slow network connection may interrupt communication between QuickBooks and the server, making it appear as if the firewall is blocking the application.
  • Check Company File Hosting Settings: If you are using QuickBooks in multi-user mode, ensure that the computer hosting the company file is the correct one. If the computer hosting the company file is not the right one, the application may fail to connect, causing the impression that the firewall is blocking the application.
  • Confirm QuickBooks Database Server Manager Installation: QuickBooks uses the QuickBooks Database Server Manager to provide multiple user access to the company file. When the QuickBooks Database Server Manager is not installed, the application may fail to connect, giving the impression that the firewall is blocking the application.
  • Verify Firewall Port Configuration: QuickBooks utilizes network ports to have communication with the database server. When the ports are closed and not accessible, communication problems happen.
  • Restart System Services: Restarting the computer or the QuickBooks-related service may resolve the firewall conflicts.

Completing these checks helps eliminate basic configuration problems before moving to more advanced solutions.

How Do You Fix If Windows Firewall Is Blocking QuickBooks

With this happening, you may experience issues such as inability to open company files, multi-user connection failures, or interrupted network communication with the database server.

The following solutions explain how to configure and resolve firewall blocking QuickBooks issues.

Solution 1: Configure Firewall Ports To Fix Windows Firewall Is Blocking QuickBooks

One of the most effective measures for resolving the problem is to set the correct firewall ports. QuickBooks Desktop needs certain network ports for the proper functioning of the QuickBooks Database Server Manager and for multiple user access to the company file.

In case the ports are closed or restricted, there are high chances that the user may encounter problems such as windows firewall blocking QuickBooks server and windows firewall blocking QuickBooks multi user.

QuickBooks versions use certain ports for the exchange of data over the network. Ensure that the correct ports for QuickBooks are opened in the Windows Firewall.

QuickBooks Version Required Ports
QuickBooks Desktop 2020 and later 8019 + dynamic ports
QuickBooks Desktop 2019 8019
QuickBooks Desktop 2018 56728, 55378–55382
QuickBooks Desktop 2017 56727, 55373–55377

Below Are The Steps On How To Create Inbound Firewall Rules

  • Click on the Start menu on your computer.
  • Type Windows Defender Firewall in the search option and open it.
  • Click on Advanced Settings, and open the firewall configuration window.
  • From the left panel, click Inbound Rules.
  • Now select New Rule from the right-hand panel.
  • Choose the Port option and click Next.
  • Select TCP and enter the QuickBooks ports that are valid for your version in the Specific Local Ports field.
  • Click Next and select Allow the Connection.
  • Make sure all profiles (Domain, Private, and Public) are selected.
  • Click Next, give the rule a name such as QBPorts (Year), and then select Finish.

Create Outbound Firewall Rules: After creating inbound rules, repeat the same steps for Outbound Rules using the same port numbers. This ensures QuickBooks can both send and receive network data without restrictions.

If the problem continues even after configuring the ports, restart your computer and relaunch QuickBooks to refresh the network configuration.

Need Assistance In Configuring Firewall Ports?

Not able to figure out the firewall port settings and still experiencing issues where Windows Firewall is blocking QuickBooks? Contact our QuickBooks experts +1-888-440-2022, and let them guide you through the process in a seamless manner to get your business accounting back on track.

Solution 2: Allow QuickBooks Programs Through Firewall

Sometimes the issue occurs not because of closed ports but because the firewall blocks specific QuickBooks executable files.

In such situations, windows firewall blocking QuickBooks server can prevent the application from accessing network resources, opening company files, or communicating with the database server.

Creating firewall exceptions for QuickBooks programs can resolve many QuickBooks firewall blocking problems.

Steps To Allow QuickBooks Programs Through Windows Firewall

  • Begin with opening the Start Menu and search for Windows Defender Firewall.
  • Click the option and select Advanced Settings.
  • In the new window, navigate Inbound Rules from the left panel.
  • Right click on Inbound Rules and choose option New Rule.
  • Select the Program option and click Next.
  • Choose This Program Path and click Browse to locate the QuickBooks executable file.
  • After selecting the file, click on Next.
  • Select Allow the Connection and proceed.
  • Mark all profiles (Domain, Private, and Public) when prompted.
  • Assign a rule name and click Finish.

You should repeat these steps for each essential QuickBooks executable file.

Some Important QuickBooks Executable Files That Need To Be Allowed Are:

The following files should be granted firewall permissions:

  • QBW32.exe – Main QuickBooks application file
  • QBDBMgrN.exe – QuickBooks Database Server Manager
  • QBUpdate.exe – Handles QuickBooks updates
  • QBCFMonitorService.exe – Monitors company file connections
  • QBLaunch.exe – Launch utility for QuickBooks services
  • QuickBooksMessaging.exe – It handles the messaging between QuickBooks components
  • FileManagement.exe – Manages file-related tasks
  • DBManagerExe.exe – Database management process
  • AutoBackupExe.exe – Responsible for automatic company file backups
  • IntuitSyncManager.exe – Syncs QuickBooks data with integrated services

Most of these files are located in the following directory:

C:\Program Files\Intuit\QuickBooks (Year)
Services related to Database may also be found under:

C:\Program Files\Common Files\Intuit\QuickBooks
Allowing these executables will make sure that the firewall does not block QuickBooks processes that are essential for hosting company files, managing database connections, and running background services.

Solution 3: Fix Antivirus Conflicts Such As Avast Firewall Blocking QuickBooks

In some situations, the issue does not originate from Windows Defender Firewall but from third-party security software installed on the system. As a result, users may encounter problems such as Avast firewall blocking QuickBooks, connection failures, or even firewall blocking QuickBooks email services.

When security software restricts QuickBooks processes, it may interfere with company file access, multi-user networking, and integrations like Outlook or webmail. This can lead to conditions where it shows that Windows Firewall is blocking QuickBooks, while the actual problem comes from antivirus firewall settings.

Antiviruses That May Interfere With QuickBooks:

  • Avast Antivirus
  • McAfee Security
  • Norton Antivirus
  • Bitdefender Security
  • Kaspersky Internet Security

These programs can sometimes prevent QuickBooks from sending or receiving network requests if the application is not listed in their trusted programs or firewall exception list.

Steps To Allow QuickBooks In Antivirus Firewall Settings

  • Open the antivirus that is installed on your computer.
  • Go to the section of Firewall or Network Protection.
  • Navigate the Allowed Applications / Exceptions / Exclusions option.
  • Add QuickBooks executable files like QBW32.exe and QBDBMgrN.exe to the list of allowed.
  • Make sure that network communication permissions are enabled for these files.
  • Save the changes and then restart QuickBooks Desktop.

Firewall Blocking QuickBooks Email

Sometimes what happens is that firewall blocking QuickBooks email occurs when QuickBooks trying to connect with email services such as:

  • Microsoft Outlook integration
  • Webmail (SMTP configuration)
  • QuickBooks internal email service

After applying the changes, reopen QuickBooks and check whether the application can connect properly without security interruptions.

If you are still stuck where antivirus restrictions or Windows Firewall is blocking QuickBooks and you cannot access your company files, contact our QuickBooks experts +1-888-440-2022 for hassle free solutions.

How To Prevent Quickbooks Firewall Blocking Issue?

After resolving the issue, it is important to follow certain best practices to prevent such instances of QuickBooks Firewall Blocking from recurring and affecting your workflow.
Some of the best practices and preventive measures to be taken to maintain smooth QuickBooks connectivity are:

  • Keep QuickBooks Desktop Updated: QuickBooks Desktop updates include critical security updates that help prevent connectivity problems.
  • Install Windows Security Updates: Ensure that your Windows operating system is updated to ensure that the Windows Firewall works correctly with the latest versions of Windows applications, such as QuickBooks.
  • Configure Firewall Permissions During Installation: While installing QuickBooks Desktop, ensure that the appropriate firewall permissions are configured correctly to prevent Windows 10 firewall blocking QuickBooks issues.
  • Maintain Correct Firewall Port Settings: Ensure that the appropriate QuickBooks ports are configured correctly, especially if there are multiple users accessing the QuickBooks company file.
  • Use QuickBooks Tool Hub for Network Issues: QuickBooks has provided the QuickBooks File Doctor tool to troubleshoot network communication problems between QuickBooks and the Windows Firewall.
  • Monitor Network Permissions for Multi-User Setup: If multi-user permissions are set up on your system, it is important to ensure that QuickBooks Database Server Manager is operating properly.
  • Avoid Using Multiple Firewall Tools Simultaneously: It is not advisable to use multiple firewall tools at once, as this may lead to unexpected restrictions on QuickBooks.

By employing these best practices, organizations can minimize the occurrence of firewall disruptions and gain smooth access to their accounting system.

A firewall is essential for protecting your system, but sometimes Windows Firewall is blocking QuickBooks, which prevents the application from accessing company files or connecting to the network. But through this guide, you’ll be able to get rid of most of the causes that are behind this issue.

By configuring firewall ports, allowing QuickBooks executables, and reviewing antivirus settings, you can restore smooth program functionality and maintain uninterrupted accounting operations.

You May Also Read:

QuickBooks Error Code List

Frequently Asked Questions

Why Does Windows Firewall Block QuickBooks?

The issue of windows firewall blocking QuickBooks usually occurs when firewall rules prevent QuickBooks from accessing the ports and services required for network communication. QuickBooks Desktop uses specific ports to connect to the database server and company files. If those ports or program permissions are restricted, the firewall may stop the application from running properly.

Which Ports Should Be Opened If Windows Firewall Is Blocking QuickBooks?

If Windows Firewall is blocking QuickBooks, you may need to open the required ports for your QuickBooks version. Some examples of common ports include 8019 and dynamic ports for the latest versions, while earlier versions may need ports such as 56728 or the range of ports from 55378 to 55382. This is to enable the QuickBooks application to connect with the database server and the network workstations.

How Do I Allow QuickBooks Through Windows Firewall?

To configure the firewall that is blocking QuickBooks, you need to configure the Windows Firewall to include QuickBooks as an allowed program. This is done by opening Windows Defender Firewall, then clicking Advanced Settings, then clicking Inbound Rules, then New Rule, and finally selecting the QuickBooks executable file and allowing the connection.

Can Antivirus Software Cause QuickBooks Firewall Blocking Issues?

Yes, third-party security tools can also cause QuickBooks firewall blocking issues. Antivirus programs with built-in firewall features may restrict QuickBooks network communication if the application is not listed as a trusted program. Adding QuickBooks executables to antivirus exclusions often resolves the problem.

Why Does Windows Firewall Blocking QuickBooks Multi User Mode?

The problem of windows firewall blocking QuickBooks multi user mode occurs when the firewall blocks communication between workstations and the QuickBooks Database Server Manager. When this happens, users may encounter errors such as H202 or H505 and cannot access the company file over the network.

Sage 300 Contact Number For Features And Benefits

When you’re looking for the right Sage 300 contact number, it can get confusing in case you need quick help with errors, login issues, or system setup. While sage 300 support is available through many possible options, getting help fast and assistance that is reliable depends on where you reach out. This guide breaks down every possible way to connect with experts and get help without delays.

For immediate assistance from Sage professionals, dial Sage 300 contact number +1-888-440-2022.

How To Reach Out To Sage 300 Contact Number?

When searching for Sage 300 contact number, it is important to understand how support is actually structured. Sage is known to deliver assistance primarily through authorized partners and subscription based channels, and not through a single universal hotline.

Businesses typically receive contact access through:

  • Sage business partner or reseller.
  • Sage Customer Portal.
  • Subscription-based phone support.

Remember, the fastest route is often through a certified support provider. This avoids delays associated with ticket queues.

Many also search for how to contact Sage 300 when facing urgent issues. In such cases, if you’re searching for Sage 300 contact number, get direct expert help by calling +1-888-440-2022.

What Is Sage 300 Accounting Software?

Sage 300 accounting software is an enterprise resource planning (ERP) solution that is made for businesses that are small to mid sized and are in need of a strong financial management and operational control. It is most widely used for managing accounting, inventory, and business processes across multiple entities.

It is known to support both on premise and cloud connected environments, which in turn gives businesses flexibility based on their infrastructure and security needs. Core capabilities include:

  • General ledger, accounts payable, and receivable.
  • Inventory and order management.
  • Multi-company and multi-currency handling.
  • Dashboards and reporting that is customizable.

As businesses continue to grow, Sage 300 accounting software practically allows them to scale their operations without any need of switching systems, making it a perfect long term solution for financial management.

If you’re facing repeated issues and are looking for “how do I log into Sage 300?”, getting in touch with our experts +1-888-440-2022 will save you time and prevent workflow disruption.

Key Features And Uses Of Sage 300

The core Sage 300 features are designed to simplify complex business operations without slowing teams down. With strong financial tools, automation and reporting it gives businesses the structure they need to run efficiently every day.

  • The main strength of the platform is in its robust Sage 300 features, especially in financial management. You get tools for budgeting, general ledger management, automated transactions, and detailed financial reporting all in one place.
  • Among the most useful Sage 300 features is multi currency and multi entity support. This is essential for businesses operating across regions allowing smooth handling of international transactions and consolidated reporting.
  • A defining part of Sage 300 accounting software is its accounts receivable and payable capabilities. You can manage invoices, track payments, process vendor transactions, and even automate tax handling with precision.
  • With real time inventory tracking, serialized stock management and automated updates you always know what’s in stock and where it’s moving.
  • Project and job costing features allow you to track budgets and expenses in detail. This makes it easier to keep projects within cost limits.
  • Another highlight under Sage 300 features is business intelligence and reporting. Custom dashboards and detailed reports provide a clear picture of performance across departments to help in making informed decisions quickly.
  • The system also supports omni-channel access. Whether you’re on a desktop tablet or phone you can access your business data anytime which adds a layer of convenience and responsiveness.
  • Integrated payment processing is a practical addition. With options integration businesses can accept payments faster and streamline cash flow.
  • Procurement and sales management tools simplify the entire buying and selling cycle from purchase orders to order fulfilment reducing manual work and improving efficiency.

Benefits Of Sage 300

Understanding the real world Sage 300 benefits can help businesses see beyond basic accounting and into long term growth. From scalability to global readiness, it’s built to support companies as they expand and evolve.

  • One of the standout Sage 300 benefits is how it gives you tighter control over business growth. You’re not just tracking numbers, you’re actually steering the direction of your company with better financial visibility and smarter reporting tools.
  • Another key Sage 300 benefits point is scalability. As your business grows the system grows with you. You can add users, expand operations and adapt workflows without needing to switch platforms.
  • A major advantage tied to Sage 300 ERP advantages is its ability to support international operations. With built in multi currency and multi language capabilities it becomes much easier to handle global clients, vendors and compliance requirements without friction.
  • You can operate from anywhere as long as you have internet access. This makes remote work multi location management and real time decision making far more practical.
  • The interface is straightforward enough for teams to adopt quickly which reduces training time and helps maintain productivity from day one.
  • Another strong point under Sage 300 benefits is improved financial accuracy. Automated transactions tax calculations and reconciliation tools reduce manual errors and keep your records audit ready.
  • Businesses also benefit from stronger compliance and transparency. Features like automatic trace logs ensure every action is recorded which helps during audits and internal reviews.
  • It supports better collaboration across departments. When finance, sales and operations are aligned within one system, decision making becomes faster and more reliable.

Sage 300 Pricing Explained

It is important to understand Sage 300 pricing before choosing the software or planning long term support. Unlike fixed cost tools, Sage 300 follows a flexible pricing structure that is purely based on business requirements.

  • Subscription-Based Model: Pricing is typically offered as a subscription, especially for cloud-connected deployments.
  • User-Based Costing: The charges also highly depend on the number of users that are accessing the system.
  • Module Selection: Businesses have to pay only for the modules that they need, such as financials, inventory, or even payroll.
  • Deployment Type: The costs also vary between on premise setup and hosted or cloud environments.

For companies evaluating Sage 300 pricing, it’s often beneficial to consult experienced professionals who can recommend the right configuration, so get in touch with the best Sage 300 customer service +1-888-440-2022.

When Do You Need Sage 300 Support?

Most businesses rely on Sage 300 support when system issues start to affect their daily operations or financial accuracies. While the software is known for high stability, there are certain situations that can still require instant expert attention to avoid any downtime or even data risks. Below are some scenarios mentioned where support is required.

  • Installation or Setup Issues: Errors that arise during initial configuration like Sage 300 login or module setup.
  • System Errors and Performance Problems: In case of slow processing, crashes, or unexpected error codes.
  • Migration of Data and Upgrade Challenges: Errors that come with the migration of data from any older system or the challenges that may be faced when upgrading to the next version of the software.
  • Cases of Failed Integration: Issues when connecting with CRM, payroll, or third party tools.
  • Security and Access Problems: The user permission errors or unauthorized access concerns.

Many users initially reach out to Sage 300 customer service, but response times can vary depending on subscription levels and support channels.

For any of the cases mentioned above or more, you can depend on our experienced professionals and get in touch with them +1-888-440-2022 to make sure your issues are diagnosed and resolved without disrupting core business functions.

How To Contact Sage 300 Support?

When looking for quick ways to resolve issues, a common question is how do I contact Sage 300 support without delays. There are multiple ways to get assistance depending on your setup and urgency.

If you’re wondering how do I contact Sage 300, here are the most practical options available:

  • Phone-Based Assistance: Many users prefer calling for immediate help. If you’re searching how to contact Sage 300 the fastest way is through a dedicated support provider +1-888-440-2022 for real-time troubleshooting.
  • Email Or Ticket System: Mostly suitable for non-urgent issues. Here requests are submitted through portals and handled based on priority.
  • Live Chat Or Online Help Portals: It is best used for quick queries and basic level troubleshooting.

For those asking how can I easily contact Sage 300 support number?, direct phone support remains the most efficient route, especially when dealing with critical errors or operational disruptions.

And if you need quick help instead of waiting? Stop looking for how to contact Sage 300 support phone number, and talk to experts +1-888-440-2022.

Sage 300 Technical Support: Direct Assistance Options

Technical issues in Sage 300 are something that require specialized expertise, and especially when they involve problems related to databases, integrations, or system performance. Experts available +1-888-440-2022 are answers to your query of how do I contact Sage 300 technical support when any standard help channels aren’t resolving complex problems.

For urgent technical concerns, direct contact through the number given is how you finally get a solution when looking into how to reach Sage 300 technical support number to get immediate assistance from professionals who understand backend configurations.

What Technical Support Covers:

  • Database errors and corruption issues.
  • System performance tuning.
  • Module-specific failures.
  • Integration troubleshooting with third-party tools.
  • Upgrade and patch-related errors.

For businesses that cannot afford downtime, how do I communicate with Sage 300 support number remains a crucial question, as direct communication with experienced technicians ensures faster diagnosis and resolution compared to general support channels.

Sage 300 Customer Service For Your Business

Sage 300 customers are here to support growing businesses that need flexibility and control over their financial and operational processes. Also, evaluating Sage 300 pricing alongside its capabilities helps businesses understand its long-term value.

  • Scalability is one thing where businesses can start with basic module support and expand as operations grow.
  • Flexible Deployment, which means that it is available for both on-premise and cloud-connected environments.
  • Strong Financial Control and accurate reporting and compliance-ready accounting features.
  • Customization makes it adaptable to specific industry requirements and workflows.

When compared with other ERP solutions, Sage 300 pricing and Sage 300 customer service +1-888-440-2022 aligns with its ability to deliver long-term operational efficiency and financial accuracy.

Quick Steps To Reach Sage 300 Support Number

When issues arise and you’re looking for how to contact Sage 300 support number to get immediate help without navigating complex channels, below is how you can get in touch to an expert quickly.

  • Identify Issue Type: Try to know whether the problem is technical, functional, or access related.
  • Get System Details Ready: Keep the version info, error messages, and system environment ready.
  • Contact A Support Provider: If you’re unsure how to contact Sage 300 support number, reaching out to a dedicated expert +1-888-440-2022 is your fastest route to get help.

Direct communication with professionals will help you avoid delays caused by ticket-based systems and ensure quicker resolution.

Alternative Ways To Get Help Faster

While traditional support channels exist, many businesses look for quicker alternatives when searching how to contact Sage 300 support without long wait times.

  • Sage Community Forums: They are very useful for basic queries and shared solutions from other users.
  • Knowledgebase And Documentation: They provide step by step guides for resolving many known common issues.

These alternatives are especially helpful when official channels are slow or unavailable. And if you’re unsure how to contact Sage 300, you can anytime get immediate assistance from experts +1-888-440-2022.

Accessing the right Sage 300 contact number and assistance quickly is something that makes the difference between a minor and a major disruption in your business operations. This guide has outlined how support options work, why relying on experienced help is often necessary, and multiple ways to get fast resolutions.

If issues are complex or even not so hard, expert support providers can step in and deliver timely solutions. For reliable assistance with Sage 300, speak with our specialists today +1-888-440-2022.

You May Also Read:

Sage 50 Solution

QuickBooks Multi-User Mode Not Working? Here’s How to Get It Fixed

QuickBooks Multi User Mode Not Working

QuickBooks multi user mode not working issue is something that can be very critical for companies that depend on collaborative accounting. QuickBooks multi user mode is used for collaborative accounting, so that multiple employees can work with the same file. However, in cases where QuickBooks multi-user mode not working errors occur, restrictions are experienced, and the workflow may face problems.

If you’re facing this problem, this guide will help you in understanding the most common causes, warning signs, and solutions that will restore the multi user functionality for you.

Having issues with QuickBooks multi user mode not working errors and need immediate help? Have a conversation directly with our QuickBooks professionals +1-888-440-2022 for quick troubleshooting.

Why QuickBooks Multi User Mode Not Working Error Happens?

When the “QuickBooks multi user mode not working” error appears, it indicates that there may be some issues in the network settings or in the permissions. QuickBooks Desktop stores all company files in a shared location on a computer that is known to be as the “host” computer. Therefore, even a small network setting can also create issues with the user access to the company files.

1. Incorrect Windows File Permissions

One of the most known reasons behind multi user mode not working QuickBooks error is the insufficient folder permissions on the server that is responsible for hosting the company file.

In a multi user environment, the folder that consists of the company file must allow access to all authorized users present on that network. If Windows permissions are not configured accurately, QuickBooks might block users from opening the file. Common permission related problems include:

  • The folder does not allow read/write access.
  • The QBDataServiceUserXX account lacks proper permissions.
  • Network users do not have access to the shared folder.
  • Administrator privileges are not enabled.

2. Firewall Or Security Software Blocking QuickBooks

Another main reason behind QuickBooks not working in multi user mode is the interference from the firewall or from the antivirus software that is installed.

Windows Firewall and any other third party security applications sometimes block the QuickBooks network ports, which then prevents the workstations from communicating with the server computer hosting the company file. This issue usually occurs when:

  • QuickBooks ports are not added to firewall exceptions.
  • Antivirus software blocks QuickBooks background processes.
  • Network traffic between computers is restricted.

3. Problems In QuickBooks Database Server Manager

Another reason for QuickBooks desktop multi user not working issue can be the QuickBooks Database Server Manager.

This tool is responsible for enabling multiple computers to access the company file that is stored on the server. If the database service is not installed, not running, or is not configured properly, QuickBooks cannot make the connection that is required for multi user mode. Commonly known problems include:

  • Database Server Manager not installed on the server.
  • Company file folder not scanned.
  • QBDBMgrN service not running.

4. Incorrect Hosting Configuration

Sometimes multi user QuickBooks not working errors occur when hosting settings are enabled on the wrong computers.

In QuickBooks network setup that is setted up properly, only the server computer hosting the company file should have hosting enabled. Because if the hosting is turned on across multiple workstations, it can create conflicts and can also block multi user access. Misconfigured hosting settings often trigger connectivity errors.

5. Improper QuickBooks Installation

In other cases, QuickBooks multi user not working problems may occur due to the improper installation of QuickBooks Desktop.

This can cause QuickBooks to fail to communicate with the server. This may happen due to:

  • Interrupted QuickBooks installation.
  • Missing program files.
  • Network components not installed.

If multi user mode QuickBooks not working continues to interrupt your accounting workflow, professional support may be required. Contact QuickBooks experts today +1-888-440-2022 for immediate troubleshooting.

Warning Signs Of QuickBooks Multi User Mode Not Working

When QuickBooks multi-user mode not working issues begin to occur, users often notice several operational problems before identifying the exact cause. Below are some common symptoms that indicate QuickBooks multi-user mode not working in your system:

  • Users cannot open the company file simultaneously. When multiple users at once attempt to access the same company file, QuickBooks may prevent additional logins.
  • Network related errors like H202 or H505 appear. These errors typically direct that the workstation is not able to communicate with the server hosting the file.
  • Slow access to the company file across the network. Performance delays may occur when QuickBooks struggles to connect with the server.
  • Frequent syncing conflicts during data entry. When multi user mode QuickBooks is not working, simultaneous transactions may fail to update properly.
  • Access denied or permission-related error messages. These errors usually appear when Windows folder permissions are not configured correctly.
  • Database server connection troubles. There may be errors shown by QuickBooks that say that the database server manager cannot locate the company file.

Identifying these symptoms can surely help in knowing whether the problem is due to permissions issues, hosting issues, firewalls, or database server issues.

Ways To Fix Multi User Mode Not Working In QuickBooks

When QuickBooks multi user mode not working issue is not allowing your team to access the company file, applying the right troubleshooting steps can solve the problem.

Below are solutions that will surely help in fixing multi user mode not working in QuickBooks and restore the multi user function.

Solution 1: Sorting The Folder Permissions On The Server

Incorrect folder permissions often trigger multi user mode not working QuickBooks errors. The folder containing the company file must allow proper read and write access for QuickBooks services and authorized users.

  1. Using the Windows button, open the File Explorer.
  2. Locate where the folder containing the QuickBooks file is.
  3. Right click the folder and select the properties option.
  4. Open the Security tab and look for QBDataServiceUserXX in the user list.
  5. Click Edit and ensure the following permissions are set to Allow:
  • Execute File / Traverse Folder
  • List Folder / Read Data
  • Read Attributes
  • Read Extended Attributes
  • Write Data / Create Files
  • Append Data / Create Folders
  • Write Attributes
  • Write Extended Attributes
  • Read Permissions
  1. Click Apply, and select OK.

After adjusting permissions, try opening the company file again in multi user mode.

Solution 2: Install / Configure QuickBooks Database Server Manager

For the QuickBooks desktop multi user not working error to happen, there is a chance that QuickBooks Database Server Manager is not installed or not configured properly on the host computer.

This is a tool that allows multiple systems to have access to the same company file stored on the server.

  1. Download the latest QuickBooks Desktop installation package.
  2. Run setup file with name Setup_QuickBooks.exe.
  3. Follow the installation steps displayed on the screen.
  4. When asked for the installation type, select Custom or Network Options.
  5. Select the option that installs Database Server Manager on the server computer.
  6. After installation, open QuickBooks Database Server Manager.
  7. Locate the Scan Folders tab.
  8. Add the folder that contains your company file and click Start Scan.

Solution 3: Using A Windows Administrator Account

Sometimes QuickBooks multi user not working problem occurs when the Windows user account does not have sufficient administrative permissions.

Administrative rights allow QuickBooks to make needful changes to system settings, firewall rules, and also folder permissions.

  1. Open Start menu and go to Settings.
  2. Click Accounts and select Family and Other Users.
  3. Choose Add someone else to this PC.
  4. Select I don’t have this person’s sign-in information.
  5. Click on “Add a user without a Microsoft account”.
  6. Enter username and password.
  7. After the account is created, select Change account type and choose Administrator.

Log in a new account and test QuickBooks multi user access.

If QuickBooks not working in multi user mode is still there after checking permissions and server configuration, professional help may be necessary. Our QuickBooks specialists can quickly identify network or server issues. Call +1-888-440-2022 to receive expert troubleshooting support.

Solution 4: Scan Company Files Using Database Server Manager

When multi user QuickBooks not working errors occur, QuickBooks may not be able to detect the company file on the network. Scanning the folder with Database Server Manager helps register the file with QuickBooks services.

  1. Open the Start menu on the server computer.
  2. Search for QuickBooks Database Server Manager.
  3. Launch the tool and go to the Scan Folders tab.
  4. Click on Browse to navigate the folder that consists of the company file.
  5. Select the folder and click OK.
  6. Choose the Start Scan option to begin the scanning process.

Once it is completed, the folder should be appearing in the Company Files Found section, confirming that the database service can access the file.

Solution 5: Configure Proper Multi-User Hosting Settings

Incorrect hosting configuration can also cause multi user mode QuickBooks not working issues.

In a proper QuickBooks setup:

  • Only the server computer should host the company file.
  • All workstations should disable hosting.

On Workstations

  1. Open QuickBooks Desktop.
  2. Go to File → Utilities.
  3. If you see Stop Hosting Multi-User Access, click it.
  4. Repeat this step on every workstation.

On The Server Computer

  1. Launch QuickBooks Desktop.
  2. Navigate to File → Utilities.
  3. Click Host Multi-User Access if the option appears.

After configuring hosting correctly, restart QuickBooks on all systems.

Solution 6: Verify QuickBooks Services On The Server

Another reason behind QuickBooks multi-user mode not working errors is inactive QuickBooks services. Two important services must run properly on the server:

  • QuickBooksDBXX
  • QBCFMonitorService
  1. Press the Windows button and R on the keyboard. This will open a dialog box.
  2. Type services.msc and press Enter.
  3. Scroll down and locate QuickBooksDBXX.
  4. Click and make sure it is set to Automatic.
  5. Confirm the status is Running. If it is not, click Start.

Confirm the status is Running

6. Open the Recovery tab and set Restart the Service for failure options.
Open the Recovery tab and set Restart the Service for failure options
7. Redo above steps for QBCFMonitorService, click Apply, and then OK.Restart computer after configuration is completed.

Solution 7: QuickBooks File Doctor Tool

If previous troubleshooting steps fail, running the File Doctor tool can fix multi user mode not working in QuickBooks by repairing company file and network issues.

The tool is available inside the QuickBooks Tool Hub.

  1. Download and install QuickBooks Tool Hub from Intuit’s official website.
  2. Open the Tool Hub and select Company File Issues.
  3. Click Run QuickBooks File Doctor option.

Run QuickBooks File Doctor option

4. Choose the company file from the dropdown menu.

Choose the company file from the dropdown menu

5. Select Check Your File and click Continue.

6. Enter the QuickBooks Admin password when prompted.

Enter the QuickBooks Admin password

7. Let the tool scan and then repair the file.

Once the repair process is done, reopen the QuickBooks software and then try to access the company file in multi user mode.

If the QuickBooks multi user mode not working error still is there even after trying these solutions, it may be directed towards deeper network or server problems. Reach out to certified QuickBooks professionals today +1-888-440-2022 for advanced troubleshooting.

QuickBooks multi user mode not working issue can disrupt the daily activities of any business, especially if it relates to accounting. This may be due to various reasons such as permissions, firewalls, hosting, and database server issues. With the solutions provided in this guide, any business will be able to resolve the QuickBooks multi user mode not working problem.

However, if QuickBooks desktop multi user not working errors persist, professional troubleshooting may be required. And, our certified experts can easily diagnose QuickBooks multi user mode not working errors, so contact them right away +1-888-440-2022 for instant assistance.

Read Here:

Windows Firewall Is Blocking QuickBooks

Get installturbotax-com: Download, Install and Activate

TurboTax is unique income tax preparation software that allows you to file state and federal tax returns in a single place in a systematic manner. It has several features that focus on maximising tax refunds.

There are several ways to get TurboTax, but the most common way is to visit the official website and download the software according to the package that suits you best. To enjoy a seamless experience, you must ensure that your system is compatible with the software. If you are new to TurboTax and wondering about the system specifications and how to install installturbotax-com, this detailed article will get you covered with the activation process!

Looking for an expert who can handle your taxes using TurboTax? Don’t worry—we are here to make this journey easier for you. Talk to our accounting experts at TFN and let them handle the installation and taxes!

Why Choose TurboTax?

TurboTax is an easy-to-use tax software developed by Intuit that offers multiple ways to complete your taxes.

Depending on the subscription you choose when installing the software, you can complete state and federal taxes with the highest possible return and 100% accurate tax calculations. TurboTax also ensures that your data is secure with encryption and multi-factor authentication.

Whether it’s personal taxes or business, TurboTax is enough to complete the taxation!

Minimum System Requirements for TurboTax Desktop 2023-2024

Since, TurboTax is an Intuit product, you must ensure you have an Intuit account and a strong internet connection. Also, keep in mind that the product is limited to single account per license code.

For Windows

(For Basic, Deluxe, Premier, Home & Business and Business Plans)

  • Operating Systems- Only Windows 10 later; Windows 10 (64-bit), Windows 11 (64-bit).
  • RAM- Your system must have 4 GB RAM or more.
  • Hard Disk Space- Total of 1 GB (plus up to 4.5 GB to download Microsoft .NET 4.8 if you have not already installed).
  • Monitor- Must have a 1024×768 or higher resolution for better use.
  • Third Party Software- Only Microsoft Visual C++ 2022 Redistributable (included with TurboTax Installer), Microsoft .NET 4.8.
  • Internet Connection- It highly recommended to use the Broadband connection of 1 Mbps modem. Required to activate the product, to get the software updates and optional online features
  • Printer- Any inkjet or laser printer but must have compatible to Windows. Ensure the Windows Administrative permissions are given.

For Mac

(For Basic, Deluxe, Premier, and Home & Business Plans)

  • Operating System- macOS Ventura 13 or later (previous versions are not supported).Be specific to these versions; macOS Ventura 13, macOS Sonoma 14, macOS Sequoia 15
  • RAM- Must have 4 GB RAM or more is recommended.
  • Hard Disk Space- minimum 1GB is required.
  • Monitor- Minimum of 1024×768 resolution or higher
  • Internet Connection- 1 Mbps modem or Broadband connection (highly recommended). It is required for product installation, activation, software updates and some crucial online features.
  • Printer- Any inkjet or laser printer that is Macintosh-compatible

Note: It is quite common when your system does not meet the specific requirements. In case you must upgrade the system to a higher version or connect with TurboTax Advisors for assistance.

Download and Install TurboTax Desktop 2023-2024

After making sure your system meets all the system requirements for TurboTax, let’s proceed with the steps below to download and install the software in the most recent version, 2023-2024.

  • Visit the official site of TurboTax.
  • Choose your preferred product as per your business needs: TurboTax Basic, TurboTax Deluxe (Federal only), TurboTax Deluxe (Federal + State), TurboTax Premier, TurboTax Home & Business, TurboTax Business.
  • Select the operating system you use, which will download the product file on your system.
  • Now, go to your Download folder or the location you choose to save the file; Windows_PC_TurboTax_Download.

To install the downloaded TurboTax file-

  • Double-click on the Windows_PC_TurboTax_Download to install the file.
  • An UAC prompt will appear on your screen asking the permissions to run the installation . Click Yes. If you are not an admin user, you will also need to enter the admin user ID and password.
  • Agree with the product’s terms and conditions.
  • Be sure to follow the instructions visible on your screen to complete the installation.
  • Now, you will need to setup the program as per your needs and tax you are going to file.

How to Activate Installed TurboTax Desktop?

You chose the appropriate TurboTax product and paid the subscription fee properly. Now, you must activate the program before you start using the tool; here is how you can do it:

  • Double-click on the TurboTax application you just installed.
  • Enter the admin credentials of your Intuit account. If you haven’t created an account yet, create it first.

turbo-tax-2023-activation

  • Enter your license number to activate the program. If you have no idea where to get it, follow the below steps:- You will find the license number on your product confirmation screen or check your product confirmation email.- If you lost the confirmation email, go to the official site of TurboTax.- Navigate the arrow to Do it yourself and then Doing your taxes with a CD/Download.- Now, click on Access my downloads.- Sign to your account using the same credentials you used to buy the product license certificate.- Choose Download and then look under the TurboTax product name for your license code.- Move back to screen for activating the product and enter the license number.
  • Once done, your TurboTax is activated and you can start with your taxation needs.

Get Started with TurboTax

Now that you have successfully installed installturbotax-com on your system and activated it, you are all set to get started with TurboTax and start paying your state or federal taxes using the tool.

If you failed to install the software or want an expert to pay taxes for you, instead of paying taxes yourself, you can reach out to us at TFN. In the meantime, you will get help filing your return and maximizing your refund.

Related Queries

  1. Can I download TurboTax for free?

Yes, you can download TurboTax for free, but only the TurboTax Free Edition, which allows you to complete a simple Form 1040 return and no other taxes. Scheduling forms are not included except for the earned income tax credit, child tax credit, and student loan interest.

  1. Can I download TurboTax if I bought the CD?

Yes, if you bought the CD, ensure your system has the CD drive and proceed with downloading and installing.

  1. How do I get a TurboTax license code?

There are three ways to get the license code when activating TurboTax. Either look in the confirmation email you received after the purchase or go to the confirmation window, which reflects the license code.

In case you lost the window and the email, sign in to your TurboTax account you created when downloading the product and go to Downloads. You will see the license number under the TurboTax product name.

  1. How much does TurboTax Desktop cost?

TurboTax Desktop offers multiple subscription plans with different features aligned to your business needs, so the price varies. The Basic plan costs $45, whereas the Business plan costs $55.

If you are going with other subscription plans, such as Deluxe, Premier, Home & Business, you can see the pricing when downloading the product, as they are included.

  1. What is TurboTax Desktop?

A TurboTax Desktop version is an application that runs on your operating system rather than on the web. TurboTax offers both Desktop and Online versions; you can opt for the one depending on your needs and the subscription fees you need to pay.